DIY Refinishing oven

The place for general discussion about guns, gun (and gun parts) technology discussion, gun reviews, and gun specific range reports; and shooting, training, techniques, reviews and reports.
Post Reply
User avatar
Netpackrat
Posts: 14002
Joined: Fri Aug 15, 2008 11:04 pm

Re: DIY Refinishing oven

Post by Netpackrat »

As usual, when presented with a wiring project, I managed to turn it into a sheet metal project:

Image

Now I have to actually wire everything together. Image
Last edited by Netpackrat on Sat Mar 05, 2016 7:31 am, edited 1 time in total.
Cognosce teipsum et disce pati

"People come and go in our lives, especially the online ones. Some leave a fond memory, and some a bad taste." -Aesop
Old Grafton
Posts: 1576
Joined: Wed Aug 20, 2008 4:07 am

Re: DIY Refinishing oven

Post by Old Grafton »

The digital display needs supplemented by randomly blinking varicolored lights. It MUST have randomly blinking varicolored lights.
Achtung.JPG
A framed copy of this is attached to my Hurco CNC mill..... :lol:
I'm not old--It's too early to be this late.
Aesop
Posts: 6149
Joined: Sat Apr 27, 2013 9:17 am

Re: DIY Refinishing oven

Post by Aesop »

Old Grafton wrote:The digital display needs supplemented by randomly blinking varicolored lights. It MUST have randomly blinking varicolored lights.
Achtung.JPG
A framed copy of this is attached to my Hurco CNC mill..... :lol:
:jacked:
We had that exact sign taped over the tape-programed computer in the high school science lab in 19mumblemumblewhere we played Hammurabi and Lunar Lander, with a teletype keyboard. And blinking varicolored lights across the front panel.

I'm currently working on installing several sets of multi-colored blinking LED Christmas lights onto a sheet of plywood, and wired into my ICBM launch control switch array, courtesy of a number of J.C. Whitney guard-protected toggle switches. Everyone's shop or man cave should have an ICBM launch control switch array. Or Enterprise navigation and helm console. Or Jupiter II flight deck. Or Millenium Falcon cockpit.

If only to strike techno-fear into the hearts of lesser mortals.

When I get to being able to simulate the launch with a subwoofer and a hydraulic jack under the foundation, I will die a happy man.

And btw, the control box for the oven looks great.

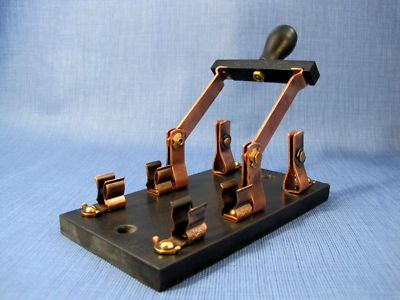
Of course, the other way to go with that would be some retro-steampunkish pressure gauges and a couple of Frankenstein Labs (tm) tesla coil-powered Jacob's ladders. And a Trumbull double-pole throw switch.
Image
Image

It'd keep the pets away, and scare hell outta visitors. :D
"There are four types of homicide: felonious, accidental, justifiable, and praiseworthy." -Ambrose Bierce, "The Devil's Dictionary"
Old Grafton
Posts: 1576
Joined: Wed Aug 20, 2008 4:07 am

Re: DIY Refinishing oven

Post by Old Grafton »

The easiest way to make a Jacob's Ladder is with any high-voltage low amp transformer (a n automobile coil will do it) and either a low amp AC or DC power supply and some .035" heliarc wire; you can light cigarettes or yourself with one, your choice/ :lol: Oil Furnace transformers are perfect.
I'm not old--It's too early to be this late.
User avatar
Netpackrat
Posts: 14002
Joined: Fri Aug 15, 2008 11:04 pm

Re: DIY Refinishing oven

Post by Netpackrat »

Question... I acquired a used oven fan off Ebay, that will be operated by one of the switches on the front of the control box. There are two clipped off wires on spade terminals on the motor... No ground connection, so I assume it is meant to ground through the frame. One of the wires is white, the other purple. What should I hook those to? I assume one is supposed to be neutral and one hot, or should it even matter which is which?
Cognosce teipsum et disce pati

"People come and go in our lives, especially the online ones. Some leave a fond memory, and some a bad taste." -Aesop
Old Grafton
Posts: 1576
Joined: Wed Aug 20, 2008 4:07 am

Re: DIY Refinishing oven

Post by Old Grafton »

The volt/ohm meter is your friend. Check each wire to th motor frame, neither should show continuity. then check across the two; should show continuity. Assuming its a residential fan it SHOULD be 115VAC, but check any motor label or stamped information on the steel case. VOM's are so cheap now that I've got one in each vehicle, the camper, and 3-4 scattered around the house and shop. I keep a few new-in-the-box to give away to young friends/ young relatives.

Yeah, I know, you almost certainly already know all this but I enjoy reading your posts and,,,,just in case...
I'm not old--It's too early to be this late.
User avatar
Netpackrat
Posts: 14002
Joined: Fri Aug 15, 2008 11:04 pm

Re: DIY Refinishing oven

Post by Netpackrat »

Thanks. I'm pretty good with DC stuff, but AC wiring always throws me for a loop. What will be more fun is wiring for the PID controller due to the Chinglish "documentation" that goes with it. I think I can figure it all out, but how to hook up the thermocouple isn't really clear. It's a Mypin TA4-SNR controller, with a PT100 probe, with two blue wires and a red, in case anybody here has more of a clue with these than I do.
Cognosce teipsum et disce pati

"People come and go in our lives, especially the online ones. Some leave a fond memory, and some a bad taste." -Aesop
User avatar
Netpackrat
Posts: 14002
Joined: Fri Aug 15, 2008 11:04 pm

Re: DIY Refinishing oven

Post by Netpackrat »

Well, it lives, more or less.

Image

Finished wiring it up tonight and it powered up like it was supposed to when I turned ze switch. I about pulled my hair out trying to look up how the wires for the thermocouple were supposed to hook up... There were two blue wires and a red, and the included diagram was black and white, with no indication of what was supposed to go where. Finally, after I had every other wire already hooked up, I went back to the auction on Ebay where I bought the kit in the first place, hoping to find some sort of additional instructions, or at least ask the seller what to do. Opened the page, and there it was staring at me in one of the photos at the top of the description. Since pic showed the unit powered up, I just hooked mine up the same way.

In terms of performance, I am slightly disappointed so far. The PID control setup is an improvement in every way, shape, and form over the thermostat built into the heating element controller (which I just left cranked at its highest setting so it won't be fighting the PID), and the oven fan I added seems to help a lot, too. The temp is probably stable enough that I can use it as-is, and what's more important, there was no scorching or burning inside at all.

That said, the PID controller is still struggling to maintain the temperature where it is set. With the unit set for 320F, with the door shut and given a few up/down cycles, it seems to pretty reliably stop just short of 340F on the upswing, and barely higher than 315F at the low point. I haven't done anything to try to program the unit beyond setting the temperature... I am hoping I can reprogram it for somewhat better regulation. I could see that it was still sending power to the element intermittently even with the temp above the target and still climbing, so I am not sure what was up with that. I'm hoping I can change that.

Interior view of the control box:

Image

It's not exactly an aircraft quality wiring job, but nothing is contacting anything it shouldn't. I may add a small cooling fan to the control box itself, but it doesn't seem to be heating up too much in there, and I would be able to tell by feeling the aluminum housing. So I think that part of it is done, at least. I ended up running the thermocouple cable outside of the box, and the probe into the oven at the rear, because there wasn't really a good place to put it from inside of the box. I would have rather kept that all internal, but I already have the power cord from the element external, that plugs into a standard outlet on the back of the aluminum housing, which is controlled by the SSR.

A bigger fan might help some, or at least angling the blades a little differently. I should probably make a guard for that since it just hangs down slightly above and behind the parts hanging rod. Though I think I am going to permanently mount some hooks to the rod so there is no reason to put one's hands anywhere near the fan and call it good. The oven has plenty of height to spare anyway.
Cognosce teipsum et disce pati

"People come and go in our lives, especially the online ones. Some leave a fond memory, and some a bad taste." -Aesop
User avatar
Netpackrat
Posts: 14002
Joined: Fri Aug 15, 2008 11:04 pm

Re: DIY Refinishing oven

Post by Netpackrat »

Declaring victory on the oven project. I did some searching, and learned there is an auto tune function built into the PID, which I ran. The temp still swings up and down a bit when the oven is first heating up, but it eventually stabilized to where it was holding well within plus or minus a degree from the target temp. I will probably add some refinements here or there, but it's ready for use now.

It cost me a bit more than I had hoped, mainly because the first configuration was a failure, and I had to add the shielding and the new controller setup. Possibly with the new controller I could have avoided the steel heat shielding, but I am glad that I added it all the same. I probably could have paid less for the material had I taken time to get it from an industrial supply rather than Lowe's, but my work schedule and child care situation makes it difficult for me to go to such places when they are open during the school year.

Total cost came to $582.91, give or take. That includes shipping to AK on some of the materials, but doesn't include the aluminum for the control housing, or most of the wiring supplies which were left overs from other projects. Given the cost of refinishing locally, after the first 2-3 guns the unit will have paid for itself. AlaskaTRX is paying for half of it, and we've got plenty of firearm projects that need it between the two of us, so there is basically no way we are not going to save money with this in the long run.

Image
Cognosce teipsum et disce pati

"People come and go in our lives, especially the online ones. Some leave a fond memory, and some a bad taste." -Aesop
User avatar
Netpackrat
Posts: 14002
Joined: Fri Aug 15, 2008 11:04 pm

Re: DIY Refinishing oven

Post by Netpackrat »

Also, a big thanks to everyone who offered comments and advice.
Cognosce teipsum et disce pati

"People come and go in our lives, especially the online ones. Some leave a fond memory, and some a bad taste." -Aesop
Post Reply