Page 2 of 6
Re: The Die Filer Build
Posted: Tue Dec 22, 2020 8:33 am
by Netpackrat

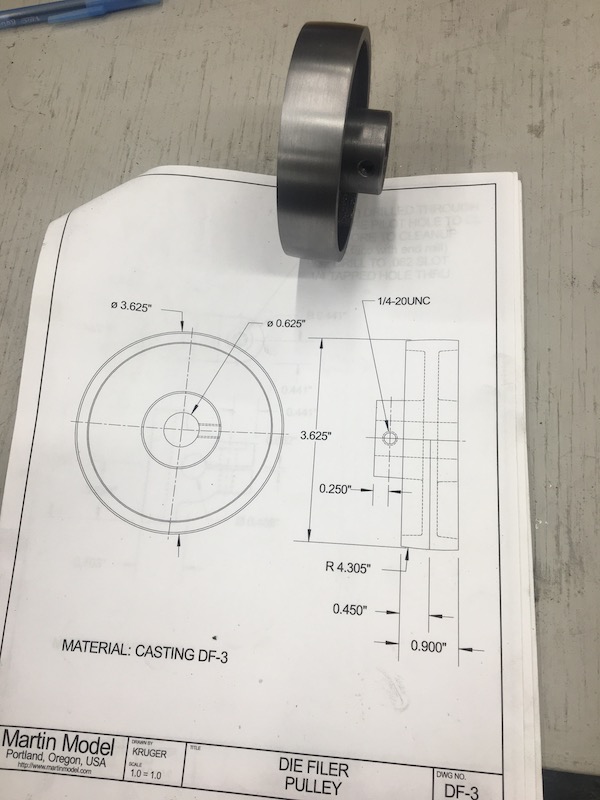
Making a drive pulley for the eventual motor. As usual, I know what motor I want to use, but shipping to Alaska is being a problem. *sigh* This is 6061t6 aluminum, ended up being 1.120" OD after I crowned it using another Youtube technique seen on the "That Lazy Machinist" channel. The print calls for a 4.305" radius on the crankshaft pulley, closest circular thing I had to that radius was an 8" steel target which I think is probably close enough to keep a flat belt in place. Basically you indicate off whatever you are using to establish the radius, and move the cross slide in to keep the indicator at zero as you traverse longitudinally. I did this in steps and then filed it until all the grooves went away.

Crowned pulley after polishing with scotchbrite and prior to parting off. I had gone in partway with the parting tool prior to crowning, to establish the edge on that side, so I just had to line it back up and finish the parting operation.

Completed pulley. Tomorrow I plan to crown the cast iron crank pulley.
Re: The Die Filer Build
Posted: Tue Dec 22, 2020 10:04 am
by Netpackrat
My local friend thinks I should make a bigger pulley for the crank end to get the strokes per minute down to something reasonable. Which is not a bad idea since I can't make the pulley at the motor end much smaller, and using a 1725 rpm motor with the pulleys I have, puts the speed at the tool at over 500 rpm. I am planning to use a variable speed motor which should help, but getting the speed down mechanically as much as possible will help out a lot in terms of usable power.
Another thought I had, is since I am planning to build a base to enclose the motor, it might not be a bad idea to stuff a jack shaft in there too with another pair of pulleys for more reduction. I think I like that more than making one huge pulley for the crankshaft end, which would be more of a pain to build a guard for.
Re: The Die Filer Build
Posted: Tue Dec 22, 2020 11:16 pm
by Netpackrat
Last night before I went to bed, I dialed the crank pulley in with the 4 jaw chuck, and repeated the same setup with the 8" steel target and dial indicator, then this morning I fired up the machine and put the crown into it.

It's not machined exactly per the print; I took less off the outer face of the pulley and let the center boss stick out the other side farther, which means the web isn't really centered. I like the idea of easier access to the set screw more than I do that of slavish devotion to the print.
Re: The Die Filer Build
Posted: Wed Dec 23, 2020 9:43 pm
by HTRN
Personally, I would have ordered a cogged pulleys, use a three phase motor, and a VFD. That way you have variable stroke speed, better power transmission, and none of the headaches of flatbelt drive.


Re: The Die Filer Build
Posted: Wed Dec 23, 2020 11:58 pm
by Netpackrat
Yeah I was looking at a motor and VFD package. The price is decent for what it is but the shipping wasn’t at all. Will get it up here somehow. I am not necessarily wedded to the current pulleys; I figure I will try them out and if they are too much of a pain I will get something different.
Re: The Die Filer Build
Posted: Thu Dec 24, 2020 11:43 am
by Netpackrat
Had kind of wanted to get the rest of the parts made from stock before messing too much with the castings, but most of those materials and some of the tools still have not arrived, so pressed on with the base yesterday morning. This seems to have worked out better than I expected it to:

I had to take many light cuts to get the bottom of the base to clean up due to the hokey nature of the setup, and I think I encountered a couple of hard spots in the casting too. Eventually got it done before I had to stop and get ready for work.

Next is to turn it around in the chuck and attempt to drill and ream the holes for the vertical shaft. The two holes have to align precisely, so I may make a special drill arbor out of some of the left over drill rod, or just use the vertical shaft itself (which I have yet to machine) and the shaft collar I made.
Re: The Die Filer Build
Posted: Thu Dec 24, 2020 2:19 pm
by Netpackrat
Anyway, it looks like that last part isn't going to be as big of a deal as I was thinking. The two parts of the base that the hole passes through are close enough together that I don't think alignment will be much of an issue, especially if I open it up with a 13/32" drill prior to reaming to 7/16". It's just all kinds of fun trying to align the casting with the tailstock, since it's all irregular surfaces. There's a precise offset for the hole given from the centerline of the part on the print; the problem is I have no real way of determining where that centerline should be. Basically I have it lined up visually with the boss and then after the first hole is machined, everything else will have to line up with that.
It may end up being a blessing that not all of my material has shown up yet. If I end up needing to make the crank bushing eccentric for alignment with the vertical shaft, I will have the option of doing that.
Re: The Die Filer Build
Posted: Mon Dec 28, 2020 5:19 am
by Netpackrat
Setup for drilling/reaming the vertical shaft:

Shaft blank in place:


The casting is almost as crooked as Hunter Biden. Making the finished product look decent is going to be a game of aligning the rest of the machined features such that they are all still true to each other, and sort of aligned with the casting. There was another builder of this kit on YouTube, who ended up with the hole for the crank bearing way offset to one side of the casting and I'd like to avoid that if possible.
As previously mentioned, I was looking at a
combo of a 3 phase motor and VFD like HTRN suggested, but the shipping to AK on the $171 combo was $154. Looked into having it shipped to my sister in WA, and they still wanted $66 for UPS ground for that.... Noticed that they were offering a free shipping deal on just the drive alone... I removed the combo from my cart and added the motor and the VFD separately, which did bring the price up to $!84 total, but it made the shipping (to AK) zero dollars. So I didn't waste a lot of time getting the order in. I expect (probably 75% odds) I will get a phone call or email tomorrow informing me that they have cancelled the order, but that's how mail order goes when you live in Alaska. Hopefully it will be a phone call so at least I will have somebody to verbally abuse.
Re: The Die Filer Build
Posted: Mon Dec 28, 2020 11:08 pm
by Netpackrat
Predictably, they wrote back asking for $135 for shipping of the motor (but the VFD is still free shipping…). I asked about USPS but I doubt if that will go anywhere. Maybe time to try ebay.
Re: The Die Filer Build
Posted: Tue Dec 29, 2020 7:49 am
by HTRN
So you have a motor shop near by? You might want to talk to them..